Your Cart is Empty

This tutorial is a follow-up to our original no-sew triangle origami pouch, but using metal snap fasteners instead of plastic snaps. Metal snaps are just as easy to use, require no sewing, and give a polished high end look to your projects.
For those new to metal snap fasteners, don't be afraid. Once you first start working with metal snaps, you'll see how easy they are to install and wonder why you didn't start earlier. Metal no-sew button poppers open another world of craft opportunities that give your DIY projects a beautiful, professional look.
Before we get started, here are some handy videos on how to install the two metal fasteners used in this project - fashion spring metal snaps and grommets.
What you will need:

Here is a close-up of the 4 parts that make up a fashion spring metal snap set, and corresponding dies.

Here is a close-up ofthe 2 parts that make up a grommet set, and corresponding dies.

Download pattern. Trace onto marine vinyl and cut.

Fold your marine vinyl into a triangles, so that you have creases as shown.

Using an awl, poke two holes at the ends/corners of your fabric using the pattern as your guide. (IMPORTANT: Be sure that your holes are not poked too far at the edge of your pattern as this will make it difficult to open/close your snap fastener).

Using the KAMsnaps KX8J professional handheld press or table press and corresponding dies for fashion spring metal snaps, install your metal snap fasteners with the socket-cap as shown.

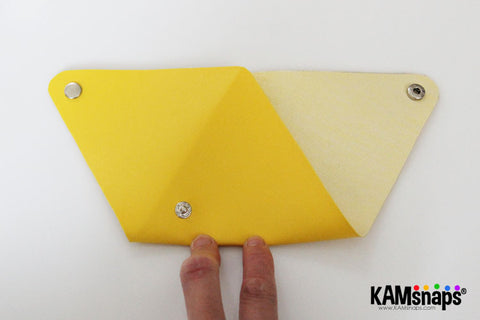
After your sockets-caps are installed on both ends/corners of your pattern, fold your pattern like shown.

Using an awl, poke a hole on the underlying 1 layer of fabric directly behind your cap. This will mark the placement of your corresponding stud-post.


Unfold your pattern, and install your stud-post parts as shown.


After your fashion spring metal snaps are all installed, your pattern will look like this (front and back view).


You're ready to fold your pattern into an origami triangle, and button up all your metal snap fasteners. The front and back of your pouch will look identical.


For added versatility, you can add a metal grommet to your pouch. First, poke a hole to mark where you want to place the grommet.

Use a hole punch tool, or scissors to cut a hole for your grommet. The cut should be big enough so that the male part of the grommet will fit through, but not too big that it will fall through. I like to first make an "x" cut, then cut a small circle around the "x".


Push male part through hole. Then place female (washer) part on top.


Using the KAMsnaps KX8J professional handheld press or table press and corresponding grommet dies , install your grommets with the male-female positioned as shown.

Your set grommet will look like this.

Hook a key chain to your pouch and you've got a hangable and handy carryall for your coins, tissue, keys, lipstick, and other knickknacks!
